Yesterday morning was the first (light) frost of the year. I was not even aware it was going to get that cold! I guess I was just not paying attention, i.e. watching the news. The temps officially got down to 33 degrees F, which to me means in some areas it did freeze.
Happily, it didn't do too much damage to my more tender plants at home. Just a twinge of grey and wilt on a few spaghetti squash leaves. The tomatoes stayed relatively unscathed.
However, my tomatoes at the community garden raised bed (ORB) were affected. When I visited I noted a good amount of dieback in the outermost, newest leaves.
So, last night I was paying attention, and I laid protective sheets over all my tomatoes last night -- both at home and in the ORB. I'm going to do what it takes to shield my tomatoes through the winter this year.
Anybody know the right thing to do with dead/frozen tomato leaves? Remove or let remain?
Showing posts with label vegetable garden. Show all posts
Showing posts with label vegetable garden. Show all posts
Wednesday, December 7, 2011


Wednesday, November 2, 2011
Time for a visit
I did not want to plant any tomatoes in the Original Raised Bed (ORB) this year because I wanted to be able to give them close attention for frost, bugs and disease.
But then I was given some extra tomatoes as a housewarming gift the day after I'd just bought a bunch of seedlings. Therefore, I did end up planting two tomatoes far, far away (a 5-minute drive) where I will not be able to care for them as well as I may like.
Not that they've needed any help so far. They are doing just fine on their own.
 This was the ORB when planted mid-September. I guess I did have a little bit of trouble with bugs eating the pepper and the 'Dark Opal' basil. I sprayed both plants with a 1-to-10 solution of dish soap and water. No more bug bites.
 This is the ORB a month later. I'd actually trimmed the 'Mortgage Lifter' tomato (on right) a few times. I've surrounded the tomatoes with protective shields of sweet alyssum, chamomile, thyme, basil and oregano.
 One last look ...
But then I was given some extra tomatoes as a housewarming gift the day after I'd just bought a bunch of seedlings. Therefore, I did end up planting two tomatoes far, far away (a 5-minute drive) where I will not be able to care for them as well as I may like.
Not that they've needed any help so far. They are doing just fine on their own.
 This was the ORB when planted mid-September. I guess I did have a little bit of trouble with bugs eating the pepper and the 'Dark Opal' basil. I sprayed both plants with a 1-to-10 solution of dish soap and water. No more bug bites.
 This is the ORB a month later. I'd actually trimmed the 'Mortgage Lifter' tomato (on right) a few times. I've surrounded the tomatoes with protective shields of sweet alyssum, chamomile, thyme, basil and oregano.
Unfortunately, the seeds I planted did not do as well as I would have liked. It may have been a little too hot still mid-September. I planted from seed some turnips, 4 to 5 lettuces, carrots, arugula, leeks and all kinds of onions.
 One last look ...
Thursday, October 27, 2011
I propose a toast: To experiments
The Grow Lab started by the county's Master Gardeners has a circular herb garden (PDF page 2) built out of wine bottles. When I first saw it, I thought, "Wow, I want to do that someday. Good thing I drink a lot of wine."
You'd use wine bottles as a border for a number of reasons. Long wine bottles are a good height for raised beds, and raised beds are helpful with drainage and keeping the soil warm. Bottles don't decay or wear down. Bottles are sturdy and pretty. And, also, why the heck not?
Fast forward a couple years, and I still had the inclination, finally had secured the location, but didn't have enough of the bottles for the experimentation.
 With the first batch of bottles, I scrubbed off the labels with soap, water and steel wool.
 It took a long time.
 I inserted the bottles neck-down into soil that I had softened up with a shovel.
To keep the bottles in a straight line while I planted them, I used long 2-by-4s left over from a previous project.
 Then I piled up soil and mulch on the outside and put my best compost and soil on the inside. The interior level is about 4 inches higher than the exterior level.
 This is also a beneficial bug experiment. To draw out the good guys, I planted sweet alyssum, lobelia, pansy, borage, viola, calendula and chamomile, plus 3 sages, 2 basils, parsley and a thyme. Here you can see a purple sage (outside) and the top of a purple sweet alyssum (inside).
 Oh yeah, almost forgot! I've also got three tomatoes, brussels sprouts, pak choi and red & white onions growing. Really cannot wait to see how the colors explode here. So far everything looks super healthy.
You'd use wine bottles as a border for a number of reasons. Long wine bottles are a good height for raised beds, and raised beds are helpful with drainage and keeping the soil warm. Bottles don't decay or wear down. Bottles are sturdy and pretty. And, also, why the heck not?
Fast forward a couple years, and I still had the inclination, finally had secured the location, but didn't have enough of the bottles for the experimentation.
I put the word out to local friends (like Leslie at Tea with Iris) that I needed their help collecting wine bottles, plus I went by a wine bistro and asked them to save a few cases for me. Soon after I had enough bottles to start my project.
 With the first batch of bottles, I scrubbed off the labels with soap, water and steel wool.
  It took a long time.
 I inserted the bottles neck-down into soil that I had softened up with a shovel.
 To keep the bottles in a straight line while I planted them, I used long 2-by-4s left over from a previous project.
 Then I piled up soil and mulch on the outside and put my best compost and soil on the inside. The interior level is about 4 inches higher than the exterior level.
With the second batch of bottles, I didn't take off the labels. I know, lazy.
 This is also a beneficial bug experiment. To draw out the good guys, I planted sweet alyssum, lobelia, pansy, borage, viola, calendula and chamomile, plus 3 sages, 2 basils, parsley and a thyme. Here you can see a purple sage (outside) and the top of a purple sweet alyssum (inside).
 Oh yeah, almost forgot! I've also got three tomatoes, brussels sprouts, pak choi and red & white onions growing. Really cannot wait to see how the colors explode here. So far everything looks super healthy.
If there is any hint of frost, I'll cover the whole thing with a large sheet/blanket using the tomato cages. (I was going to make those circular tomato houses out of chicken wire this year, but instead decided to save money and use what I have.)
So do you think it looks better with or without labels?
Thursday, September 29, 2011
Why not do your best with what you've got?
In the past I've had others make garden beds for me. Or I've used an existing community garden bed. But now that I have
 What's that? A shed? Let's check out what's inside.
 Look at all these construction materials the former owners left in here! What can we use to make a raised bed? There are unused fence posts, drywall, untreated 2-by-4s, bricks, cement, tiles, paint buckets, a mirror ...
I think I know what we'll use.
 Now, I need to choose where we want to place the bed. A nice sunny spot near the house. Sounds great! Only problem is that I have to dig up about 4 inches of pebbly cover material before reaching the soil.
 So I scrape it off, then double-dig about 4 inches lower to till up the sandy soil underneath.
 I carry a bunch of the 2-by-4s over to my neighbors', and he uses his table saw to cut them into the pieces for my keyhole design. Then I take them back and drill them together with galvanized screws ($8.50 a box).
I am not handy. This drilling takes a long time. And it probably is not done "correctly."
 Good thing my main man is working on the sprinklers out front and we have a bunch of extra soil. I need that soil for the garden!
 We truck all the soil back in a wheelbarrow. Now I'm mixing all the sandy desert soil from the front yard with mulch and other good stuff.
 My 2-year-old and 4-year-old help me carry the 12-by-6 frame over. We set it on the hard gravel material, then start filling it up with soil. Note the bricks from the shed, used in the keyhole! A soaker hose left over from last year's community garden bed is installed an inch underneath the topsoil.
 The finished bed is ready for planting. I'll let it settle for a few days.
Total cost: about $25 for the box of nails and the soil amendments. The rest of the materials were on site.
Let's see if we can get anything to grow in here!
- More room
- More time
- My own space, with no one (such as an HOA) telling me how it should look
- Secret weapons (scrap materials, kind neighbors, helpful family members, leftovers from other projects)
... well, all those things made it easier for my family to do it on our own.
I'm proud of anyone who takes on the task of growing their own food, no matter how it is accomplished. Of course, I think it's important to challenge yourself, but you've also got to be realistic about your capabilities and use what you have! That could mean searching your attic or shed for materials, hitting up neighbors for help or scrap materials, or even asking a handy friend to build your garden for you, if that's what it takes.
The process (which took more than a week):
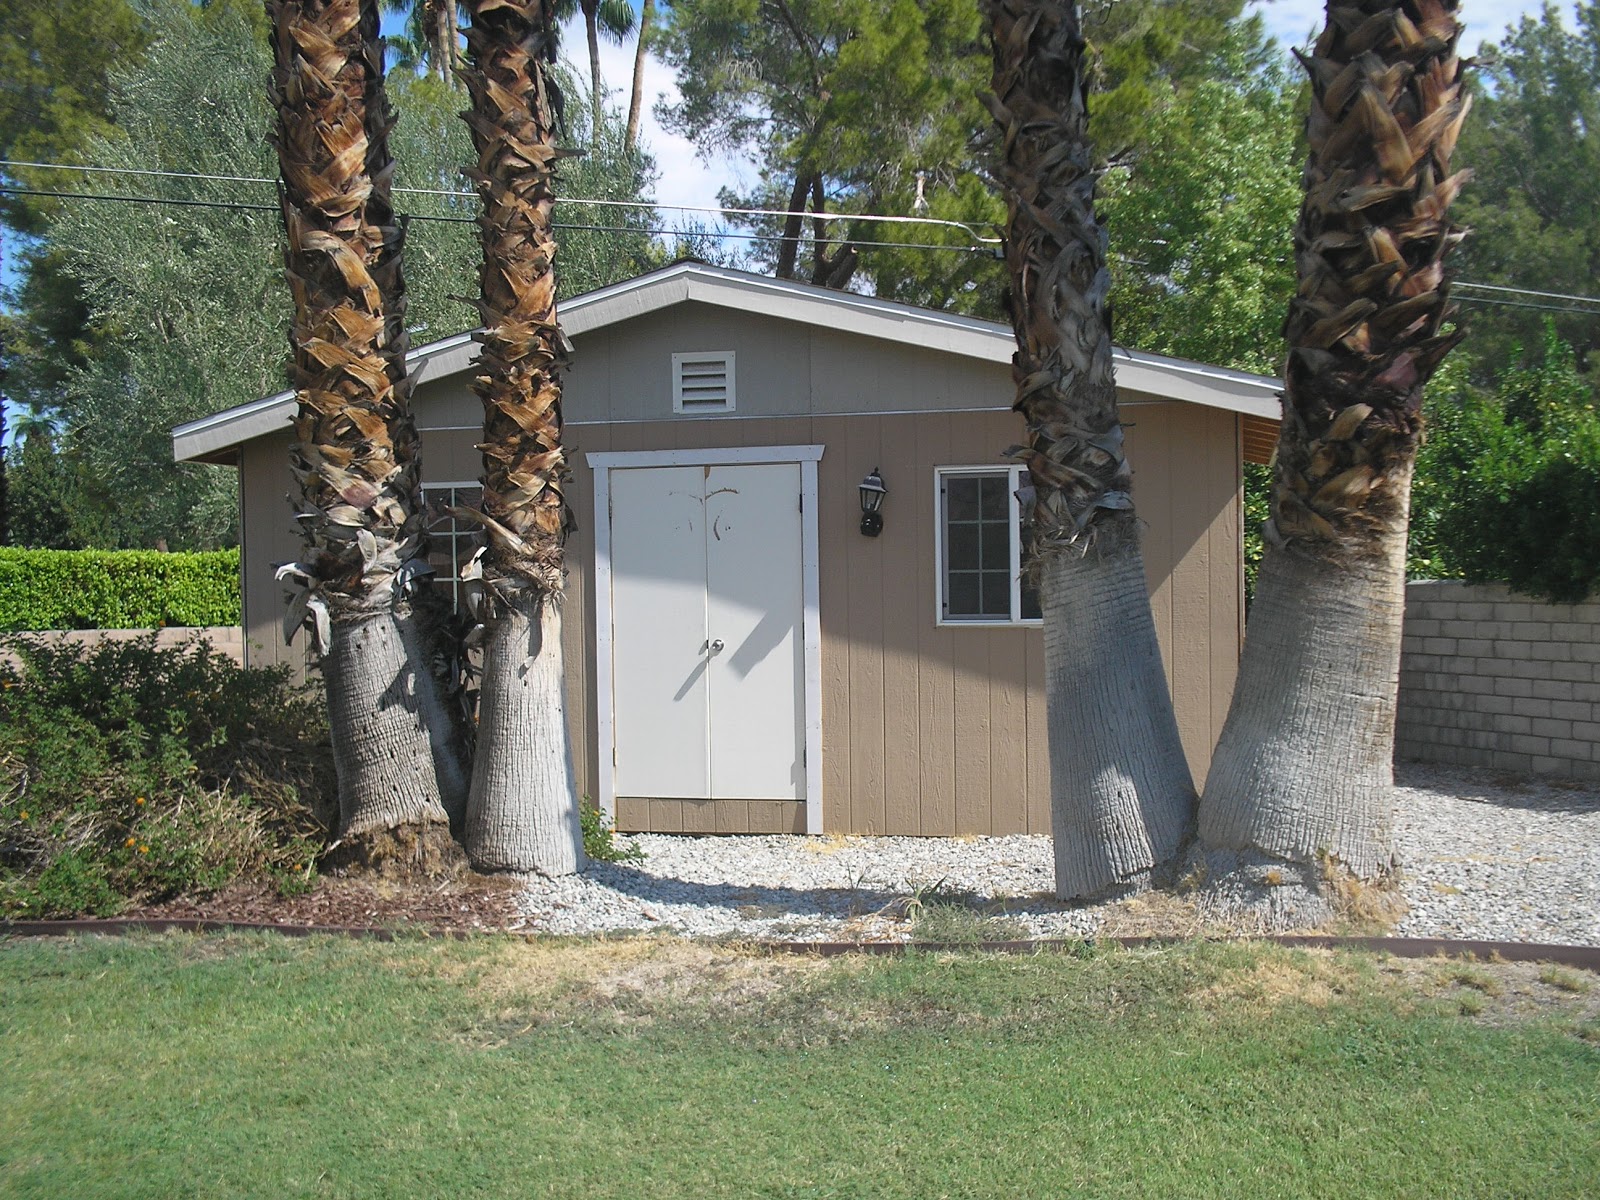 What's that? A shed? Let's check out what's inside.
I think I know what we'll use.


I am not handy. This drilling takes a long time. And it probably is not done "correctly."
 Good thing my main man is working on the sprinklers out front and we have a bunch of extra soil. I need that soil for the garden!


Total cost: about $25 for the box of nails and the soil amendments. The rest of the materials were on site.
Let's see if we can get anything to grow in here!
Tuesday, September 20, 2011
A Case of Gardener's Block
Temperatures have been lower, so the past few days I've been walking my backyard, sketching it, considering it, photographing it, considering it ... everything but DOING something in it.
I started a few seeds indoors for broccoli and lettuce, but my mental now-now-now push to plant a vegetable garden outside, well, it's been waking me up in the middle of the night.
Warning: "Before" photos ahead!
I thought I knew where I was going to put a huge lasagna mulch for the foundation of my vegetable garden. Now after studying it for a few days, it seems like that area is too shady. So am I going to cut down two trees or choose a new spot?
Something must be planted soon or I think I am going to miss this growing season.
My other two potential vegetable garden sites are not as ideal; they would require more work (removal of gravel or pebbles) before mulching. But they do get a good deal more sun.
I started a few seeds indoors for broccoli and lettuce, but my mental now-now-now push to plant a vegetable garden outside, well, it's been waking me up in the middle of the night.
Warning: "Before" photos ahead!
 |
| Former planned site for vegetable garden. South-facing back fence, shed and black cat Deuce (she says hi). |
Something must be planted soon or I think I am going to miss this growing season.
 |
| Plus: Close to house. Irrigation ready. Minus: Close to house. Not a large space. |
 |
| Plus: Well situated by shed. Minus: A ton of gravel covers area. Not a large space. |
Sunday, June 12, 2011
Occasional Basket #4

I don't know why I haven't been keeping up with these baskets!
Wednesday, June 8, 2011
We're moving
I feel like I can finally say it: We are moving to a house in a neighboring city, Palm Desert.
I suppose there is still a chance that it won't happen, but we are far enough along in the process that I am confident.
This means that my gardening dreams are going to come true. I've been advised by veteran gardeners to sit tight for the next few months, get a feel for the landscape and not plant anything new yet (exactly, it's going to be 110 degrees). But the planting will come soon enough.
I'll have room to compost the way I'd like to. A solar oven will be built. There will be spots for giant herb gardens. A shed for cuttings, seedlings and equipment. Fences on which to grow espaliered trees. My mind whirls with the possibilities.
I suppose there is still a chance that it won't happen, but we are far enough along in the process that I am confident.
This means that my gardening dreams are going to come true. I've been advised by veteran gardeners to sit tight for the next few months, get a feel for the landscape and not plant anything new yet (exactly, it's going to be 110 degrees). But the planting will come soon enough.
I'll have room to compost the way I'd like to. A solar oven will be built. There will be spots for giant herb gardens. A shed for cuttings, seedlings and equipment. Fences on which to grow espaliered trees. My mind whirls with the possibilities.
In support of community gardens
Didn't seem like much. Just two acquaintances who decided to form an alliance and grow vegetables in the same raised bed.
But since January of this year, when a fellow plant-lover and I started a community garden in our homeowner's association, I have had a great time and I've learned so much from him.
His one tomato plant has been a star, pumping out huge fruit for months, while 3 feet away my three plants have *ahem* produced some fruit. What's his secret? He pruned back a good portion of the foliage and didn't let the plants go all leafy. My plants are too vegetative; his plant's energy went to the fruit.
He turned me on to delicious banana peppers, which I plan to grow every year.
I was simply blown over (with admiration) by his guff ... he planted 5 or 6 raised beds at the other end of our community ... without permission from the HOA. His response: "It looked so ugly over there. This looks better." No argument from me. And the HOA retroactively approved it!
Always happy, always had a great outlook on life. Definitely an attitude to emulate.
Community gardens are the best way to meet people who share a love for horticulture -- even if it's just one cool dude. I'll be sorry to leave the raised bed we started here when my family moves, but I hope it will be a way for others in the HOA to have the same social-gardening experience that I did.
But since January of this year, when a fellow plant-lover and I started a community garden in our homeowner's association, I have had a great time and I've learned so much from him.
His one tomato plant has been a star, pumping out huge fruit for months, while 3 feet away my three plants have *ahem* produced some fruit. What's his secret? He pruned back a good portion of the foliage and didn't let the plants go all leafy. My plants are too vegetative; his plant's energy went to the fruit.
He turned me on to delicious banana peppers, which I plan to grow every year.
I was simply blown over (with admiration) by his guff ... he planted 5 or 6 raised beds at the other end of our community ... without permission from the HOA. His response: "It looked so ugly over there. This looks better." No argument from me. And the HOA retroactively approved it!
Always happy, always had a great outlook on life. Definitely an attitude to emulate.
Community gardens are the best way to meet people who share a love for horticulture -- even if it's just one cool dude. I'll be sorry to leave the raised bed we started here when my family moves, but I hope it will be a way for others in the HOA to have the same social-gardening experience that I did.
Wednesday, June 1, 2011
Recharged and ready
Returned from northern lands this week to *surprise* find these poking out under leaves in my original raised bed (ORB):
 Beautiful long yellow, purple and green beans ready to eat for dinner.
I've got some new ideas and plans for the coming months. Thanks for bearing with me while I went through a little funk!

I've got some new ideas and plans for the coming months. Thanks for bearing with me while I went through a little funk!
Thursday, April 21, 2011
Oh no, you don't!
Caught the first interlopers today on my tomato plants.
While watering upstairs in Tomato Heaven, I saw some little black dots on the leaves of my Yellow Pear variety ... and then right above them ... a small green worm. The same type of cabbage looper worm that got my plants last year!
I said aloud, "Oh no, you don't!!" and grabbed it in my fingers, squishing it to DEATH.
Yes, gross. But this is war, kids. I am so not joking about this. All vermin who try to eat my tomatoes, or leaves or stems ... or even try to look sideways at them ... will die horrible deaths.
Later, I was on the lookout in the Condo Raised Bed, and I saw a dusting of tiny eggs across both the Jubilee and Black Cherry varieties, plus caught two worms. Mine Mighty Hand of Worm Death smited both loopers down, and then I hard-sprayed the affected leaves with water to remove the eggs.
This afternoon I'm getting some natural pest control, such as Bacillum thuringiensis. No one but humans will eat my tomatoes this year.
While watering upstairs in Tomato Heaven, I saw some little black dots on the leaves of my Yellow Pear variety ... and then right above them ... a small green worm. The same type of cabbage looper worm that got my plants last year!
I said aloud, "Oh no, you don't!!" and grabbed it in my fingers, squishing it to DEATH.
Yes, gross. But this is war, kids. I am so not joking about this. All vermin who try to eat my tomatoes, or leaves or stems ... or even try to look sideways at them ... will die horrible deaths.
Later, I was on the lookout in the Condo Raised Bed, and I saw a dusting of tiny eggs across both the Jubilee and Black Cherry varieties, plus caught two worms. Mine Mighty Hand of Worm Death smited both loopers down, and then I hard-sprayed the affected leaves with water to remove the eggs.
This afternoon I'm getting some natural pest control, such as Bacillum thuringiensis. No one but humans will eat my tomatoes this year.
Saturday, March 26, 2011
Start 'em young, serve it fresh
 Story of this photo: Earlier this week it was raining, which is altogether uncommon in the desert. My big girl Charlotte and I were moving some of my container plants out from under the eaves so they could get rained on.
 Afterward we checked on my raised bed around the corner, and I decided to snap off a broccoli head for dinner. Charlotte asked to carry it back home, and it looked so huge in her small hands that I ran to grab my camera. Then she took a big old bite out of the broccoli and smiled right before I took the shot.
Wednesday, March 2, 2011
Tomato crazed (or My Ode to Tomatoes)
 Maybe I've gone a little overboard with tomatoes in 2011. But with good reason. I adore the fruit and would give anything to grow it well.
Last year I messed up my timing twice.
First mistake: I planted too late -- the end of March. My 2 poor vines (that I unwisely placed in the same large pot) only provided me with a handful of semi-decent tomatoes before the scorching 100-plus-degree desert summer stopped the fruit from setting and weakened them to a point where the bugs just took over. If you're keeping track, that's 0 for 2.
Second mistake: I planted 3 new tomatoes -- but too late again, in mid-October. These poor vines caught some weird disease, and then sadly provided only 2 tomatoes (that took weeks to ripen in a paper bag) before getting leveled by frost over Thanksgiving. Total 2010 Score: a pitiful 0 for 5.
So this year, with my 2010 shutout in mind and some newly acquired knowledge under my belt, I am determinate (a little tomato humor there) to raise a bumper crop of beautiful tomatoes.
I have 3 varieties in my condo raised bed (CRiB), 5 varieties in containers on my upstairs balcony and 1 variety in a container by my front door. NINE kinds: Heatwave II, Black Cherry, Jubilee; Early Girl, Better Boy, Black Zebra, Green Zebra, Yellow Pear; and Siberia.
 Yes, I know, I haven't planted any in my original raised bed (ORB). Probably won't. Logic dictates that the ORB's distance from my home means it should be left to species that don't need so much attention (lettuce, peas, onions, carrots, broccoli).
Planting was in late January and mid-February. I've got until early June, really, to fulfill my "Mission: Tomato." I'm going to set the bar low and call it a win if I can get 15 tomatoes from each plant.
Tuesday, February 15, 2011
Now we are growing
 I've got two strawberries, broccoli, celery, lettuce and three types of tomatoes. We will see how it goes. My co-gardener has planted his side as well now.
Thursday, February 3, 2011
Ongoing fresh food
 By the way, as the CRB (condo raised bed) is being built, my ORB (original raised bed) is going off! Had broccoli (in front corner), peas (tall growing) and lettuce (all over) with homemade pizza tonight. Yes, indeed.
 Just for fun, this is a picture of the same garden three months ago.
Friday, January 28, 2011
Community garden ... in my "backyard"
I've been loving my raised bed in the community garden over in Palm Desert. Plenty of posts here are testament to that.
But the stars have aligned, all my ducks are in a row, the ink has dried, the dishes are done ... and there will soon be a 5-by-10-foot raised bed about 20 feet from my back patio door. Just in time for end-of-January planting.
Long ago (last August), at a homeowners association board meeting I asked if the HOA could spare a small space for residents to grow things. The board told me to gather some other interested folks and come back later. I posted a few notices and sat by my computer waiting for the excited emails to come pouring in.
And ... I heard from one guy who wanted to build the garden with me. Better than zero! But then right about that time I got into the Palm Desert garden, so starting a my own community garden from scratch quickly lost its appeal.
Fast-forward to this month when I happened to attend another board meeting, just to see if they were still considering letting me do build the garden.
Surprise! Before I could really say anything, the board voted to let me try a test garden right by my home. Here is what it looks like now:

But the stars have aligned, all my ducks are in a row, the ink has dried, the dishes are done ... and there will soon be a 5-by-10-foot raised bed about 20 feet from my back patio door. Just in time for end-of-January planting.
Long ago (last August), at a homeowners association board meeting I asked if the HOA could spare a small space for residents to grow things. The board told me to gather some other interested folks and come back later. I posted a few notices and sat by my computer waiting for the excited emails to come pouring in.
And ... I heard from one guy who wanted to build the garden with me. Better than zero! But then right about that time I got into the Palm Desert garden, so starting a my own community garden from scratch quickly lost its appeal.
Fast-forward to this month when I happened to attend another board meeting, just to see if they were still considering letting me do build the garden.
Surprise! Before I could really say anything, the board voted to let me try a test garden right by my home. Here is what it looks like now:

Thursday, November 4, 2010
So, who's with me?

Now it has been a little more than two weeks since I first planted everything. Notably absent? The spinach and the broccoli.
Spinach should show up almost immediately, and there has not even been one tiny sprout. I'm mystified, because the rest of my greens have sprouted fine. Is my soil too acidic? Spinach (from what I've read) doesn't do well below a pH of 6.0.
The broccoli (or what may have been broccoli) looks like a tiny stalk with its leaves eaten off. For what it's worth, most gardening books say to start broccoli inside and transplant the seedlings outside.
Best so far from seed? The sweet peas (below). So tall and healthy I'll need to make a teepee for them soon.

The transplants (tomatoes, eggplant, strawberries) are thriving. Only issue is spacing: my neighbor's absolutely gigantic tomato plant shades over onto my side. Just look at that monster (below, far right). Harrumph.
Edited to add: Owen and I yesterday replanted the spinach seeds, and I bought and planted a broccoli seedling Nov. 5.
Subscribe to:
Posts (Atom)